Every home buzzes with energy, thanks to the intricate web of circuits and wiring hidden behind its walls, which connect to the electrical panel and power the entire house through various electrical work. The heartbeat of modern living is a safe and functional electrical setup, where volts and amps dance through service wires into the main service panel, distributing power to individual branch circuits through an overcurrent device. PVC conduit protects the service wires as they perform critical electrical work, carrying electricity through the wiring to each corner of our homes, ensuring that every room meets the family’s electrical services needs. From lighting up dark spaces to keeping your gadgets charged, residential electrical services form the unseen backbone of a house’s system—a critical section that demands respect and understanding for a harmonious home life. Ensuring proper grounding and using PVC conduit are essential for the safety of these services, while the right equipment maintains their efficiency and reliability.

Basics of Residential Electricity

Electricity, a must-have in modern homes, not only powers everything from lights to laptops but also relies on efficient electrical services. The electrical meter and electrical panel are central to managing this flow, while the electrode conductor ensures safe grounding. It’s crucial to understand the basics of electrical services, like volts and amps, and how safety devices within your electrical panel, such as circuit breakers, protect branch circuits through grounding.

Understanding the Basics

Electricity might seem like magic, but it’s all about the science behind electrical services, from the electrical panel to the wire and electrode conductor. Let’s break down the essentials of your electrical service: volts, amps, watts, ohms, and the role of the electrical panel. Understand the importance of the electrode conductor and ensure your wire specifications match your system’s requirements. These are the building blocks of electrical systems.

  • Volts (V) measure electrical force or pressure.
  • Amps (A) gauge current flow in the electrical panel; more amps mean more electricity buzzing through the wire, with the electrode maintaining the circuit’s integrity within the electrical service.
  • Watts (W) tell us power usage in electrical service; higher watts equal more energy consumed, often requiring a higher amp wire and electrode.
  • Ohms (Ω) indicate resistance in an electrode; fewer ohms mean electricity through the wire flows easier, requiring less amp from the electrical service.

Consider your home’s electric system, including the electrical service, as a water pipe. Just as a water pipe requires proper grounding to ensure safety, your home’s electrical setup needs secure grounding for protection. The service entrance conductors act like the main artery of water flow, while the disconnect functions similarly to a valve controlling the supply. Volts would be the water pressure, amps the amount of water flowing through, and ohms how narrow the pipe is, which in electrical service terms would correspond to the size of conductors, typically measured in AWG copper. Watts? That’s like measuring the size of your bathtub to determine how quickly you can fill it up, ensuring the amp rating matches the breaker on your panel.

AC vs DC

Ever heard of AC/DC outside of rock music? In electricity land, copper conductors carry the tunes, not a band, but two types of current: Alternating Current (AC) and Direct Current (DC), humming through the panel at various amps.

  • AC powers most homes and businesses. It zigs-zags back and forth in the wires.
  • DC is steadier, flowing in one direction—think batteries or solar panels—through conductors like copper, ensuring efficient bonding and stable amp delivery.

Your gadgets need AC from the service panel to charge up at home but switch it to DC internally because it’s simpler for small circuits, often using copper conductors. It’s like dancing different styles – at home you might boogie down with some fancy moves (AC), but inside your phone, it’s just nodding along to the beat (DC). Just as a panel manages the flow of dance rhythms, a breaker ensures the service isn’t overwhelmed, while bonding keeps the steps in sync.

Circuit Breaker Lowdown

Circuit breakers, acting as goalies in soccer, prevent trouble from scoring an own-goal on your house’s electrical panel by stopping fires or damage to appliances. They are essential conductors of safety in the service system, ensuring effective bonding to protect your home. They do this by:

  • Monitoring electrical flow
  • Cutting off power at the breaker panel when there’s too much juice—like flipping off conductors when someone overloads a service plug with too many gadgets.

Fuses are old-school circuit breakers in the electrical panel that burn out instead of tripping off to interrupt service. You have to replace them in the panel every time they blow, which can be a hassle compared to just flipping a service switch back on.

NEC Importance

The National Electrical Code (NEC) isn’t just another rulebook—it keeps you safe from shock or fire hazards by setting standards for residential electrical service installations.

Here’s why NEC matters:

  • It sets guidelines for safe wiring methods.
  • Inspectors use their service to check if your house is up-to-code before you move in or sell.

Following NEC service guidelines means sleeping soundly knowing your house won’t surprise you with an electric shockwave pajama party!

Assessing Home Electrical Capacity

Evaluating your home’s electrical system is crucial to ensure safety, service reliability, and efficiency. Signs of service overload, proper service labeling, and energy usage calculations are key components of this service assessment.

Evaluating Load Capacity

Your house is like a bucket but for electricity. It can only hold so much service before it starts to spill over. The capacity of your home’s electrical system service is measured in amps. Think of amps as the size of the bucket. Older homes might have a 60-amp service, but modern homes usually need at least 200 amps to run all those gadgets we can’t live without.

To figure out if your electrical service has enough juice, check the amp rating on your main circuit breaker. This service number tells you the maximum amount of electricity your home can handle safely.

Overloaded Circuit Signs

Have you ever had the lights flicker when you turn on the microwave service? That’s like your service panel at home saying “Help, I’m too full!” Here are some telltale signs that your electrical service circuits are overloaded.

  • Flickering or dimming lights
  • Breakers that trip repeatedly
  • Outlets that feel warm to the touch
  • A burning smell from outlets or switches

If these signs are recognizable, it’s time to enlist a professional service before your electrical bucket overflows and leads to severe complications.

Proper Panel Labeling

Imagine trying to find a friend’s apartment service without any room numbers. That’s what an unlabeled electrical panel is like. Knowing which switch controls what service is super important, especially in emergencies. Grab a label maker and start identifying each circuit in your panel:

  • Lights in the kitchen
  • Outlets in the living room
  • Air conditioner unit

This simple step could save you loads of trouble down the road.

Appliance Energy Usage

Ever wonder how much it costs to run your fridge all year? Calculating appliance energy usage isn’t rocket science; here’s how you do it:

  1. Find out the wattage on the appliance label.
  2. Multiply watts by hours used per day.
  3. Convert this to kilowatt-hours (divide by 1000).
  4. Multiply by your electric rate (check your electric bill for this).

For example, if your TV uses 100 watts and runs for 5 hours daily:

100 watts x 5 hours = 500 watt-hours/day 500 watt-hours/day ÷ 1000 = 0.5 kWh/day 0.5 kWh/day x $0.12/kWh (electric rate) = $0.06/day

Small numbers, sure, but they add up!

Residential Electricians’ Service Types

Electricians are the go-to pros for installing and fixing our electrical needs. They ensure everything is up to code, and they’re ready at a moment’s notice when things go haywire.

Installation Services

Your home’s a complex web of wires. It’s got cables running through walls, hidden like secret tunnels. When you need new lights or sockets, electricians are the wizards who make it happen. They work with:

  • Service wires that power your whole place
  • Outlets and switches for all your gadgets
  • Fancy fixtures to brighten up rooms

They’ll chat with the utility company too, making sure service entrance conductors are A-okay.

Repair Tasks Handled

Stuff breaks – it’s just life. But with electricity, you can’t just slap on some duct tape and call it good. That’s where electricians come in clutch. They tackle:

  • Flickering lights that give off haunted house vibes
  • Dead outlets that leave your phone gasping for juice
  • Overloaded circuits that trip more than clumsy toddlers

They’re like healthcare pros for your home’s veins of voltage.

Inspection Services

Safety isn’t just a sticker on your helmet; it’s serious business at home too. Electricians poke around in crawl spaces and attics, eyes peeled for trouble before it starts. Inspections focus on:

  • Making sure service conductors aren’t fraying like old jeans
  • Checking breakers aren’t older than your grandpa’s dance moves
  • Ensuring everything meets those big-deal code standards

It’s about keeping sparks in the fireplace, not behind your walls.

Emergency Response Ready

When things go south with electricity, there’s no time to chill and binge-watch shows. You need heroes who answer the bat signal ASAP—electricians are those heroes. They’re geared up for:

  • Power outages darker than midnight without stars
  • Sparks flying like a 4th of July gone wrong
  • Scary burning smells where there shouldn’t be any

They dash over faster than you can say “blackout.”

In this electrified world we live in, these services aren’t just handy—they’re essential as pizza on game day. Whether you’re jazzing up your pad or keeping it safe from sparky disasters, residential electrical services have got you covered.

And remember how we talked about assessing home electrical capacity? Well, these services tie right into that—like checking if your system can handle another AC unit without throwing a tantrum.

So next time you flip a switch or plug in your charger, think about the squad of electrician gurus ready to keep things humming along smoothly.

Home Electrical System Maintenance

Keeping your home’s electrical system in tip-top shape is crucial. Regular maintenance can help prevent dangerous mishaps and costly repairs.

Routine Check-Ups

It’s like a health check for your house. Just as you’d visit the doctor, your home needs regular check-ups to keep it safe and sound. This isn’t just about flicking switches on and off. It’s about peering into the heart of your home’s electrical work to catch any sneaky issues before they become big problems.

  • Inspect the electrical panel for signs of wear
  • Listen for buzzing sounds from the circuit breakers
  • Look out for any unusual smells near wiring

Dust Cleaning Safety

Dust bunnies aren’t just unsightly; they’re potential fire starters. A quick clean-up isn’t just about keeping things looking spick-and-span—it’s a matter of safety.

  • Use a dry cloth to wipe away dust gently
  • Avoid spraying cleaners directly onto electrical elements

Test Your GFCIs

GFCIs are like lifeguards at the pool—they’re there to save you from an electric shock when things go wrong. Testing them monthly is a no-brainer task that takes less than a minute but could make all the difference in an emergency.

  1. Push the “Test” button on the GFCI outlet
  2. Confirm that power cuts off
  3. Hit “Reset” to restore power

Tighten Outlet Covers

Loose outlet covers are more than an eyesore—they’re invitations for trouble, hiding potential electrical needs behind them. A simple twist of a screwdriver can secure them back into place, ensuring everything stays snug and safe.

  • Check each cover plate in your entire house
  • Tighten screws carefully without cracking the plate

Essential Electrical Know-how

Understanding what lies behind our walls powers our homes safely and efficiently. From ground rods to fuse boxes, knowing how these components interact is key.

  • The main service panel directs electricity throughout your home
  • Circuit breakers protect against overcurrent by tripping when overloaded
  • Emergency disconnects provide a quick way to cut power during crises

Incorporating routine checks into your calendar ensures that all these parts function together seamlessly—like cogs in a well-oiled machine.

By staying vigilant with these simple tasks, you safeguard not only your family but also every gadget and gizmo plugged in under your roof. Plus, you’ll sleep better knowing that you’ve done everything possible to prevent an unwelcome spark or sizzle where it doesn’t belong.

Remember, while DIY maintenance can handle some minor tasks, always call in professionals for more complex electrical issues or if you’re unsure about anything related to wires or currents!

Upgrades and Installation Services

Your home’s electrical system is like the nervous system of your house. It needs to keep up with technology and your energy demands.

Panel Upgrades

Old panels can’t always handle today’s appliances. A panel upgrade ensures your system meets your current electricity needs. It could be about adding more amps to support a new HVAC system or just making sure that new gaming room doesn’t trip the breakers every other day.

  • Increased capacity for renovations
  • Support for high-energy devices

Upgrading helps avoid potential problems down the line. Think of it as future-proofing your pad for whatever tech comes next.

Surge Protectors Install

Voltage spikes are no joke—they can fry your gadgets in seconds. Installing surge protectors can save you from the heartache of losing your prized electronics. This isn’t just plugging in a power strip; we’re talking about a whole-home system that shields everything, from the fridge to the flat-screen.

  • Protection against unpredictable spikes
  • Safety for all household electronics

It’s like having a superhero guard your house against invisible enemies—those nasty surges won’t stand a chance.

Smart Home Automation

Imagine controlling lights, temperature, and security with a simple voice command or smartphone tap. That’s smart home automation for you! Integrating this into your electrical system isn’t just cool; it’s efficient.

  • Convenience at its best
  • Energy savings through optimized use

You’ll be living like The Jetsons before you know it, with everything at your fingertips—or voice!

LED Retrofitting

Still using old-school light bulbs? Time to switch to LED lighting! Retrofitting with LEDs means brighter spaces and smaller bills—it’s a win-win situation!

  • Drastic reduction in energy consumption
  • Long-lasting lights that rarely need replacing

LEDs are not just about saving money; they also give off better light which means no more dull corners in any room!

Solutions for Home Equipment Power

Getting your home equipment to run smoothly is essential. It’s all about safe power and smart energy management.

Dedicated Circuits Installation

High-energy appliances aren’t just power-hungry; they’re like the big kahunas of your electrical system. Your HVAC system and dryer? They need their own personal space, or in electrician speak, dedicated circuits. This isn’t just a fancy upgrade—it’s about safety and efficiency.

  • Installing a dedicated circuit prevents overloading.
  • It ensures high-energy appliances operate optimally.

Imagine plugging in that monster of a dryer without its own circuit. The lights flicker, the TV pauses – it’s chaos! A dedicated circuit keeps the peace by giving those big guys their own turf to play on.

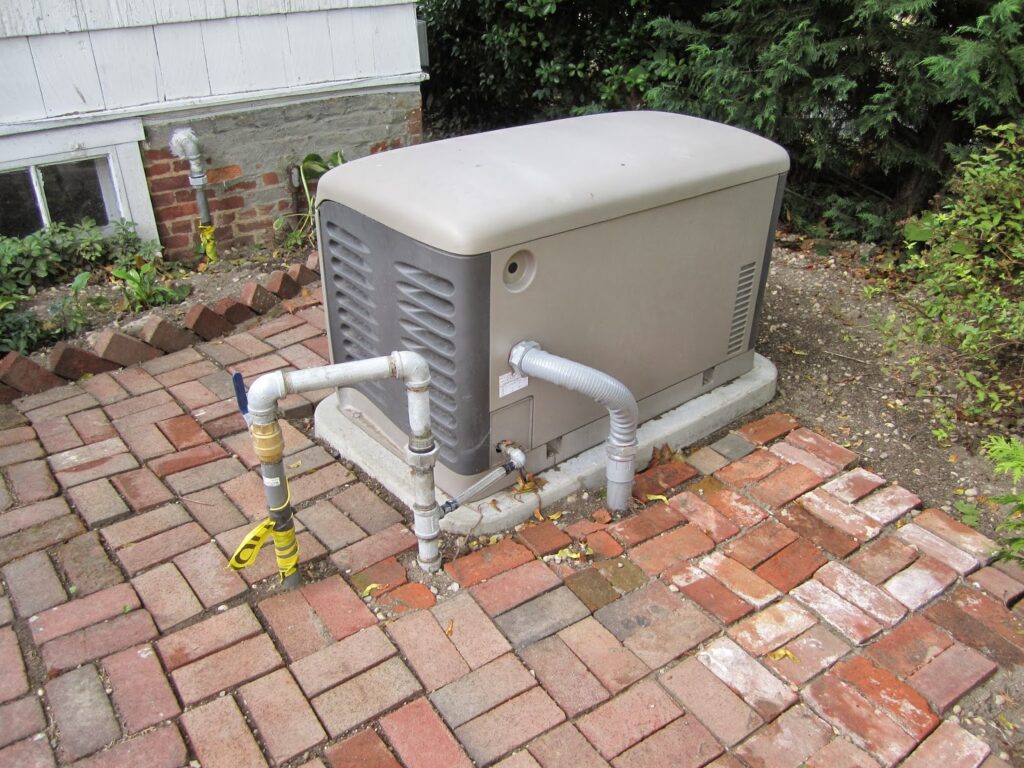
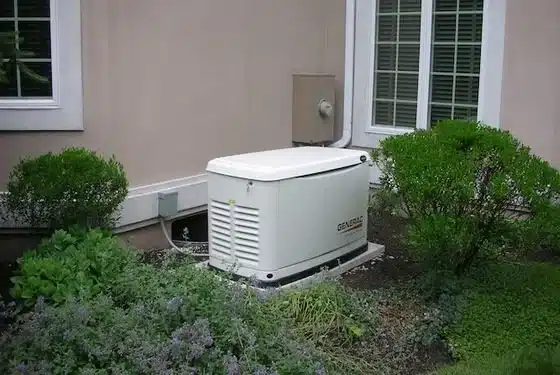
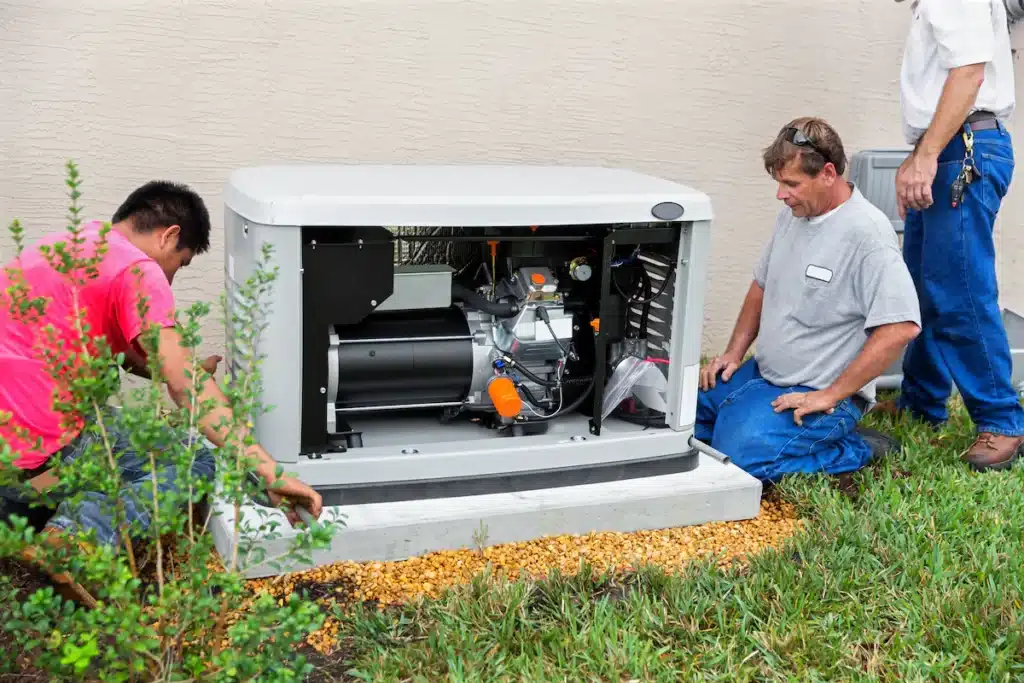
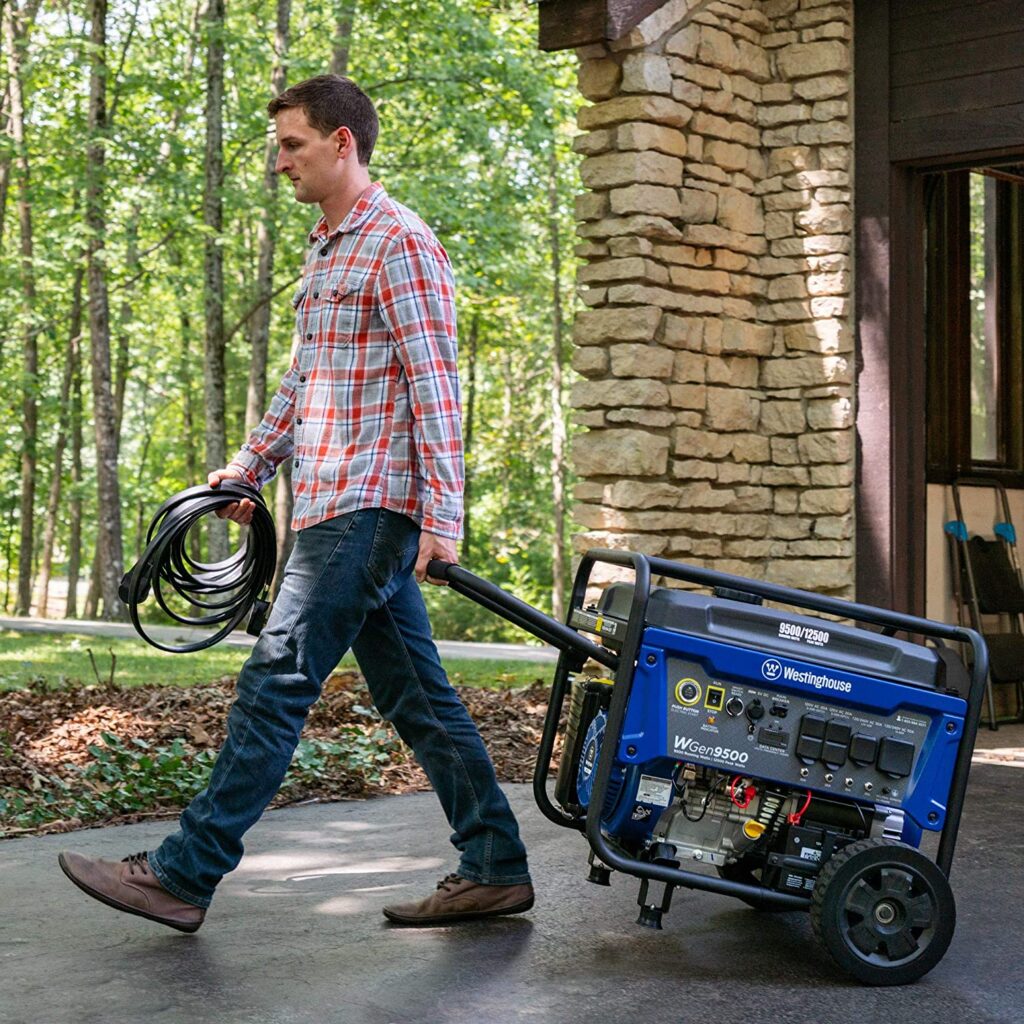
Backup Power Solutions

Power outages are no joke—they turn your home into a scene from an old-timey movie where candles were the rage. Enter generators and battery systems, the superheroes of backup power solutions.

  • Generators keep things running during extended outages.
  • Battery systems offer quieter, more sustainable options.

Think about that freezer full of food you’ve stocked up—without backup power, it’s a countdown to an indoor barbecue you weren’t planning on having. With backup power, life goes on as usual: lights on, fridge humming, everyone happy.

Energy Management Tactics

Smart homes aren’t just cool; they’re clever with their energy too. Programmable thermostats and timers can make your home not just comfortable but also cost-effective.

  • Thermostats save money by adjusting temperatures automatically.
  • Timers ensure equipment only runs when needed.

It’s like having a tiny robot helper who turns down the heat when you’re snuggled in bed or makes sure your coffee is brewing right as you wake up—energy-saving ninjas for modern living!

Extension Cord Safety

Extension cords are lifesavers when you need power where there isn’t any. But they’re not all created equal—the right gauge and length matter more than you think.

  • Heavy-duty cords handle more wattage for high-power devices.
  • Shorter cords reduce tripping hazards and energy loss.

You wouldn’t use a straw to slurp up a milkshake—the same goes for extension cords and electricity. Pick one that can handle what you throw at it without turning into a fire-starting villain lurking in your living room.

Ensuring Electrical System Health

Your home’s electrical system is like the beating heart of your residence, pumping life into all your gadgets, appliances, and lighting. Just as you’d keep an eye on your health by scheduling regular check-ups, it’s crucial to monitor and maintain your home’s electrical well-being. Whether it’s through routine maintenance or considering an upgrade to handle more modern demands, staying proactive can save you from the headaches of unexpected power issues down the line.

Remember, keeping your electrical system in tip-top shape isn’t just about convenience; it’s a matter of safety for you and your loved ones. Don’t wait for the lights to flicker or the breakers to trip. Reach out to a trusted residential electrician today and give yourself peace of mind. Your home deserves nothing less than a clean bill of electrical health!

Diving into DIY electrical projects, like installing solar panels or wiring a dedicated circuit, can electrify your home’s functionality while trimming down costs and ensuring your circuit breaker is up to the task. With a solid grasp of wiring basics and the right tools in hand, you’re set to tackle electronics projects that not only brighten spaces but also sharpen your skills in installing a dedicated circuit, integrating a sensor, or replacing a circuit breaker for a job well done. Remember, respecting the electrical codes and standards when installing wiring and circuit breakers is not just about compliance—it’s about ensuring safety in every connection you make, especially when setting up a dedicated circuit for a motor. Before you strip a wire or flip a circuit breaker in your electrical system, honestly assess your skill level with wiring and sensor integration; knowing when to call in a pro can be the most powerful tool of all, especially when dealing with complex motor circuits.

“Electricity is really just organized lightning.” Harness its energy wisely, ensuring proper wiring and circuit breaker installation, as you embark on your next DIY adventure with a motor in your vehicle.

Safe vs. Professional Electrical Tasks

Know Your Limits

DIY electrical projects involving vehicle wiring can be tempting, but it’s crucial to understand the difference between what’s safe to tackle, like changing a motor, and what requires a professional, such as installing a circuit breaker. Recognizing when a system’s sensor signals that the motor is out of your depth can prevent serious mishaps with the breaker.

Low-Risk vs High-Risk

Some tasks within a system are no sweat for the average Joe or Jane with a bit of know-how and a breaker. Swapping out light fixtures? Usually, that’s a breeze. But messing with service panels? That’s high-voltage territory – literally. Here’s the lowdown:

  • Low-risk jobs in the electrical system: Replacing switch plates, installing dimmers, or changing light bulbs without touching the breaker.
  • High-risk jobs in the electrical system: Upgrading circuits, wiring entire rooms, or handling anything near the main power line of the system.

Call The Pros

There’s no shame in tapping out of the system when things get hairy. Knowing when to ring up a licensed electrician isn’t just smart; it could save your life and ensure your electrical system is safely maintained. So when should you make that call?

  • If you’re scratching your head over wiring diagrams.
  • When permits and inspections enter the conversation.
  • Anytime you feel like you’re in over your head.

Power Off Protocol

Before diving into any DIY task within the system, cutting the power is rule number one. It’s not rocket science – just flip the breaker or yank out the fuse for your work area. Better safe than sorry!

Gear Up

Your outfit matters big time here too! Slap on some protective gear to keep yourself in one piece:

  • Insulated gloves: No zappy hands!
  • Safety goggles: Keep those peepers safe from sparks and debris.

Basic Outlet Replacement Techniques

Replacing an outlet? First, cut the power. Then, remove the old one and wire up the new, checking your work.

Cut the Power

Safety first! Before you touch anything, head to your circuit breaker. Flip off the switch controlling power to that outlet. Grab a voltage tester. Confirm there’s no current running. You’re safe to proceed.

Remove Old Outlets

Old outlets can be tricky. They’ve been in place for years, maybe decades. Unscrew the cover plate first. Then, gently pull out the outlet from its box.

You’ll see wires attached at the back or sides. Loosen these screws carefully. Detach all wires from the outlet.

Keep track of how they were connected—you’ll need this info soon.

Wire New Outlets

New outlets look shiny and complex but fear not! Match those wire colors with their rightful places:

  • Black wires are hot; they go to brass screws.
  • White wires are neutral; they find a home on silver screws.
  • Green or bare copper? That’s your ground wire; it hooks up to green screws.

Ensure connections are tight but don’t overdo it—wires are delicate creatures!

Test Functionality

Got everything hooked up? Good job! Now, let’s see if it works:

  1. Return to your circuit breaker.
  2. Flip that switch back on.
  3. Plug in a simple device—a lamp will do nicely.
  4. Flick that switch and watch for light!

No sparks or flickers? Perfect—you’ve nailed it!

Step-by-Step Circuit Breaker Mastery

Mastering your home’s circuit breaker involves locating the panel, resetting breakers, labeling circuits, and performing safety checks.

Arduino Basics for Beginners

Arduino is a versatile microcontroller perfect for DIY electronics projects. With it, you can create everything from simple gadgets to complex robots.

What Is Arduino

Arduinos are tiny computers that can sense and control more of the physical world than your desktop computer. They’re used by students and hobbyists alike to make cool things in the realm of electronics. These devices can interact with buttons, LEDs, motors, speakers, GPS units, cameras, the internet, and even your smartphone or TV!

Setting Up IDE

Before diving into building and coding your first project, you’ll need to set up the Arduino Integrated Development Environment (IDE) on your computer. This software allows you to write programs for the Arduino and upload them to the board.

  • Download the Arduino IDE from the official website.
  • Follow installation instructions specific to your operating system.
  • Connect your Arduino to your computer via a USB cable.
  • Select your board type and port in the IDE settings.

With these steps completed, you’re ready to start programming!

Writing Simple Sketches

Writing code for an Arduino is done using sketches – simple programs that tell your microcontroller what to do. Let’s say you want to blink an LED:

  1. Open a new sketch in the Arduino IDE.
  2. Write code that turns an LED on and off at intervals.
  3. Verify and upload the sketch to see it in action.

This process introduces you to basic coding concepts such as loops and functions without overwhelming complexity.

Basic Circuitry Know-How

To bring ideas to life with an Arduino involves understanding basic circuitry. Pins on an Arduino connect electronic components like sensors and motors through a breadboard which helps organize circuits without soldering.

  • Digital pins send on/off signals controlling devices like LEDs or motors.
  • Analog pins read signals from sensors measuring light or distance.

By experimenting with different setups, you’ll learn how various components interact within a system.

Projects Examples

Now that we’ve covered some basics let’s look at projects that beginners can tackle:

  • A temperature monitoring system using a thermistor sensor
  • An ultrasonic rangefinder that measures distance
  • A robot controlled via Bluetooth from your phone
  • An automated plant watering device triggered by soil moisture levels

These projects illustrate how diverse applications of Arduinos are across different areas – each requiring time but offering lots of learning opportunities!

Remember: Every expert was once a beginner. Starting small gives you room to grow over time as you explore this exciting area of DIY electronics! And don’t worry about messing up; every mistake is just another step towards mastery—just like when we tackled circuit breakers before jumping into microcontrollers.

Advanced Arduino Projects Exploration

Arduino opens doors to a world of advanced DIY electrical projects. These projects can range from creating smart home systems to building your own robotic vehicle.

Wi-Fi and Bluetooth Integration

Imagine controlling your gadgets wirelessly. That’s where integrating Wi-Fi or Bluetooth modules with Arduino comes into play.

  • With a Wi-Fi module, you can turn lights on and off from your phone.
  • Bluetooth lets you send data between devices, like a custom remote control for your stereo.

Complex Code Creation

Now, let’s crank up the complexity. Using Arduino libraries makes writing complex code for automation tasks less daunting.

  • Libraries are like cheat sheets for coders.
  • They help manage sensors or handle network connections without breaking a sweat.

Robotics with Servos

Robots are cool, right? Utilizing servos and motors in robotics projects gives life to your creations.

  • A motion-controlled robotic vehicle could be at your fingertips.
  • Think of servos as muscles that give movement to robot limbs or wheels.

Data Logging and Controls

Data is king in any high-tech project. Implementing data logging and time-based controls takes your project to the next level.

  • Track temperature changes over time in a greenhouse setup.
  • Automate watering plants precisely when they need it most.

Solar Power Harnessing with Arduino

Harness the sun’s power to fuel your DIY electrical projects. Learn how to build a solar tracking system, monitor energy output, store excess power, and manage battery systems using an Arduino board.

Small-Scale Solar Tracking

Designing a solar tracker might sound like rocket science, but it’s actually a fun weekend project. With an Arduino at its heart, you can create a device that ensures your solar panel is always facing the sun. This maximizes energy absorption throughout the day.

  • Use light sensors to determine the sun’s position.
  • Code your Arduino to adjust servo motors for optimal panel angle.

Energy Output Monitoring

Knowing how much power your panels are pumping out is crucial. By hooking up sensors to your Arduino, you can keep tabs on this in real time. It’s like having a fitness tracker but for your solar panel – keeping you informed about its health and productivity.

  • Install current and voltage sensors on your setup.
  • Create dashboards on your computer or smartphone to display live data.

Storing Excess Energy

On sunny days, your panels might collect more juice than you need right away. You don’t want that extra energy going to waste! With clever coding strategies on the Arduino platform, you can direct surplus power into storage units efficiently.

  • Write code for detecting when batteries are fully charged.
  • Automate diversion of excess energy to secondary storage or back into the grid.

Battery Management Systems

A smart battery management system is like having a guardian angel for your batteries. The Arduino takes charge here as well, making sure each cell in your battery bank is healthy and balanced. This prolongs their life and keeps them performing at their best.

  • Monitor individual cell voltages and temperatures.
  • Balance charging cycles with software algorithms programmed into the Arduino.

By diving into these DIY electrical projects powered by Arduino, not only do you get hands-on experience with renewable energy tech—you also contribute to a greener planet. Whether it’s ensuring every ray of sunlight is captured or being savvy about storing that sweet solar power, these projects pack both an educational punch and an environmental one too!

Summary of Electrical Journey

You’ve powered through from the basics to some pretty charged-up projects, and that’s no small feat. Whether you were swapping out outlets or getting your hands dirty with Arduino and solar power, you’ve amped up your DIY skills big time. Remember, safety is always the priority—don’t bite off more than you can chew with live wires. Stick to what feels comfortable, and for those hair-raising tasks, let the pros handle them.

Now that you’re equipped with this electric knowledge, why not put it into action? Start small if you’re a newbie or take on a sunny challenge by integrating solar power into your next project. Share your electrifying creations online, help out a friend, or even teach others. You’ve got the spark; now go light up the world with your new-found skills—and don’t forget to keep learning!

Diving straight into the heart of your home‘s electrical wiring, tackling electrical problems can be a mix of detective work and basic know-how. When dealing with a circuit breaker issue or complex wiring tasks, it’s essential to call in a professional electrician. Only a licensed electrician should handle these critical components to ensure safety and efficiency. From flickering lights to a rogue circuit breaker, common electrical problems often demand the attention of a licensed electrician with a keen eye and steady hands equipped with the right test equipment for electrical cords. Yet, there’s a thin line between a DIY fix for wiring problems and an electrical issue that screams for a licensed electrician to handle electrical problems with electrical cords. While grasping electrical terminology lays the groundwork for safe troubleshooting, understanding when circuits and copper wires warrant the skills of a professional electrician is crucial, especially when addressing wiring problems or faulty receptacles. It’s often best to consult a technician to ensure safety and accuracy. Before you tackle that wiring or fiddle with a light switch, let’s arm you with the knowledge to distinguish between a minor troubleshooting task and an electrical complication that requires a professional electrician’s expertise.

Safety First: Managing Junction Boxes

Before you tackle the heart of a junction box to address potential electrical problems, remember to turn off the power and inspect for any signs of trouble, such as overloaded circuits or faulty wiring. Ensure that electrical cords are in good condition to prevent any electrical issue. Also, ensure all electrical cords are securely connected and replace worn-out wiring covers to maintain repair standards and keep things up to code with proper troubleshooting.

Power Off Protocol

Always shut off the electricity at the main panel before popping open a junction box to inspect or replace electrical cords, wiring, or receptacles and prevent a potential short circuit. This isn’t just good sense; it’s a lifesaver. The danger level skyrockets when you mess with live wiring, potentially causing equipment damage or a code violation, especially around motors. So hit that switch, secure the wiring, and lock down the equipment if you can, minimizing the danger level by controlling the current. No shortcuts here.

Overload Inspection

Junction boxes can be like mini traffic jams—too many wires trying to go through can cause issues, potentially leading to a code violation. Overcrowding with wiring for motors and other equipment can complicate the situation further. You’re looking for signs that say “overload” loud and clear in your equipment, indicating issues with components such as the pump and motors.

  • Wires crammed together
  • Discolored or melted insulation
  • A faint burnt smell

These are red flags, friend. They indicate that your equipment’s motor is overexerting, a sign of a potential component problem and a major electrical code violation waiting to occur.

Secure Connections Check

Inside that junction box, every wire, crucial to the equipment’s motor, should have its own comfy spot. Each one must be snugly connected to another wire or terminal, ensuring a stable current with no problem in connectivity. Loose connections? Not on our watch! Here’s what you gotta do:

  • Tighten screws on wire nuts
  • Make sure caps are on tight
  • Double-check that no bare wire is exposed

If that motor’s equipment wires aren’t cozy and capped, they’re throwing caution—and electrical current safety—to the wind, risking a potential problem.

Cover Replacement Tips

Old or damaged covers? They’ve got to go. These motor protectors shield your wires from dust, damage, current fluctuations, and curious critters. Plus, they keep your motor setup looking tidy and manage the current to stay within code standards.

Here’s how you handle them:

  1. Remove screws carefully.
  2. Lift off old cover gently.
  3. Align new cover precisely.
  4. Secure with fresh screws.

Remember: A cracked cover is an invitation for trouble.

Diagnosing Frequent Bulb Burnouts

Bulbs burning out too often? It’s time to check the current, motor wattage, socket condition, bulb quality, and environmental factors. Let’s troubleshoot these pesky electrical problems.

Check Wattage Compatibility

The right bulb for the right fixture is key. A mismatch can cause burnouts.

  • Always match the light bulb wattage with what your fixture rating allows, ensuring the motor’s current is compatible.
  • Using a motor with a bulb that’s too powerful can lead to overheating, frequent burnouts, and excessive current draw.

Inspect Socket Condition

A bad socket can ruin your day—and your lighting. Look for signs of wear or damage.

  • Corrosion inside the socket interrupts proper electrical contact.
  • Damage from past surges could compromise connection stability.

Evaluate Bulb Quality

Not all bulbs are created equal. Invest in quality for longevity.

  • Cheap bulbs, much like a motor with fluctuating current, often have a shorter lifespan and fail sooner.
  • High-quality bulbs with efficient motor designs might cost more upfront but save you money in the long run by lasting longer and using less current.

Vibration Impact on Lifespan

Shake, rattle, and roll isn’t great for bulbs. Steady does it.

  • Places with heavy foot traffic or machinery, such as motors, can cause excessive vibration.
  • Ensure light fixtures and motor mounts are secure to minimize movement and extend bulb life.

Resolving Flickering Lights Issues

Flickering lights can be a nuisance, hinting at underlying electrical or motor issues. To resolve motor issues, it’s crucial to check for loose bulbs, faulty switches, and overloaded circuits in the motor system.

Tighten Loose Bulbs

Loose bulbs might seem like no biggie, but they’re often the culprits behind flickering lights. Before you call in the pros or mess with your circuit breaker, try this:

  • Give each bulb a gentle twist to ensure it’s snug in its socket.
  • For light fixtures with multiple bulbs, check each one—sometimes it’s just a single rogue bulb causing trouble.

If tightening doesn’t do the trick, we’ll need to dig deeper.

Faulty Switches Check

Ever flipped a switch and noticed a strobe effect? That’s not you channeling your inner disco; it could signal something off with your switches or plugs.

  • Inspect switches for any signs of damage or wear.
  • Listen for buzzing sounds when toggling them on or off—a telltale sign that replacement is due.

Replacing switches isn’t rocket science but messing with wires can be risky business if you’re not sure what you’re doing. Safety first!

Overloaded Circuit Detective Work

Your home’s circuits are like highways for electricity. Too much traffic and things start to slow down—or in this case, flicker.

  • Check if high-wattage appliances are hogging the spotlight on one circuit.
  • Consider spreading out energy hogs across multiple circuits to ease up the load.

Remember: A circuit trying to power too many gizmos at once is like trying to run a marathon while juggling—something’s gotta give!

Localized vs Whole House Flickers

Is it just me or is the whole house having a rave? Determining where the flickering happens can clue us into the issue:

  • If it’s just one room or area, you might have an isolated problem—like that dodgy switch we talked about.
  • Whole-house flickering? That’s more serious. It could mean torque variations from your utility company or even issues with your service pole connection.

Figuring out if your entire pad has got the jitters versus just one room can save you time and cash when troubleshooting.

By breaking down these steps and checking off potential causes one by one, we get closer to banishing those pesky flickers back into non-existence. And remember: If fiddling around with electrical stuff makes you feel like you’re in over your head—it probably means you are! No shame in calling in reinforcements (a.k.a., licensed electricians) who eat voltage for breakfast. Stay safe and keep those lights steady!

Troubleshoot Non-Functional Light Switches

Troubleshooting a light switch involves checking for connectivity, listening for sounds, and replacing worn-out parts. These steps can pinpoint and solve most switch malfunctions.

Voltage Tester Check

Grab your voltage tester tool. It’s time to play detective with your non-functional switches. Carefully remove the switch plate and place the probes on the terminals. The absence of a voltage reading screams “problem.” No beep or light from the tester? You’ve got a culprit in your electrical circuit.

  • Ensure power is off before removing the switch plate.
  • A working switch will show a voltage reading.

Listen for Sounds

Silence isn’t always golden, especially. Flip that suspect switch up and down. Hear a crackle or pop? That’s no symphony; it’s an SOS from your switch mechanism telling you something’s wrong inside.

  • Fizzing noises hint at faulty wiring.
  • Clicks should be crisp; anything else is suspicious.

Smooth Operation

Old switches can be as stubborn as mules. If pushing feels like you’re doing arm day at the gym, it’s not right. A smooth operation is key for any light switch worth its salt.

  • Switches should flip easily without resistance.
  • Hard-to-move switches are begging for retirement.

Replace Worn-Out Parts

Out with the old, in with the new—it’s not just a saying, it’s what your light switch needs sometimes. If troubleshooting points to a tired old switch that’s seen better days, roll up those sleeves and get replacing.

  1. Turn off power to avoid shocking developments.
  2. Unscrew the faceplate and then remove the old switch.
  3. Connect wires to the new one—color-coded paths are there for guidance.
  4. Securely screw everything back into place—the snugger, the safer!

Remember:

  • Always double-check wire connections for safety.
  • Test your new installation before celebrating victory.

Repair Techniques for Loose Outlets

Before you dive into repairs, always shut off the power. Fixing a loose outlet can prevent hazardous situations and ensure stability for your plugs.

Power Off First

Safety is not a joke. Always turn off the electricity to the outlet you’re working on. This is a non-negotiable step to avoid shock or injury.

  • Find your home’s breaker box.
  • Flip the switch corresponding to the room with the problematic outlet.

Realign Outlet Contacts

Loose plugs are annoying, right? It’s often due to stretched contacts inside the outlet. Here’s how you get them back in shape:

  1. Remove the outlet cover with a screwdriver.
  2. Use needle-nose pliers to gently bend the contacts slightly closer together.

This should give your plug that snug fit it once had.

Secure Outlet Properly

A wobbly outlet can drive anyone up the wall—literally! If it’s detached from its stud, here’s what to do:

  1. Unscrew and pull out the outlet carefully.
  2. Check if there are broken parts that need replacing.
  3. Secure it back using longer screws if necessary, directly into a wall stud.

Your outlets should now sit tight against the wall without moving around when you use them.

Replace Damaged Units

Sometimes an outlet has lived its life—cracks and all. When this happens, replacement is key:

  1. Purchase a new receptacle that matches your electrical system.
  2. After turning off power, disconnect wires from old receptacle and remove it.
  3. Connect wires to new one following proper color coding: black to brass screw, white to silver screw, green or bare wire to green screw.
  4. Screw in new receptacle and replace cover plate.

Voila! You’ve got yourself an outlet that could pass as brand spanking new!

Tips to Reduce Electricity Consumption

Swap for LED Bulbs

Switching to LED bulbs from those old-school incandescent ones is a no-brainer. LEDs are the superheroes of energy efficiency, using up to 90% less power. They last longer too, so you won’t be on a first-name basis with the hardware store clerk from constant replacements.

Think about it: if your house was rocking with five incandescent bulbs before, and you flip the switch to LEDs, that’s like cutting down a whole chunk of your electricity bill. And who doesn’t want a few extra bucks in their pocket?

Smart Power Strips

Ever heard of ‘vampire power‘? It’s not as cool as it sounds. Your electronics, even when off, can suck power like a vampire sucks blood. Enter smart power strips – they slay these energy vampires by cutting off standby usage.

Imagine plugging your TV, game console, and sound system into one of these bad boys. You leave for work or school, and bam! The strip senses nobody’s using them and cuts the power flow. That’s some smart savings right there.

Thermostat Savvy

Getting your thermostat settings right can save you big time on heating and cooling costs. You’ve got to play it like Goldilocks – not too hot in summer, not too cold in winter.

In winter, set it around 68°F when home; drop it lower when you’re out or snoozing under cozy blankets. Summer? Aim for 78°F or higher when at home and chillin’ in shorts. This simple tweak could save you about 10% a year on energy bills!

Maintain Major Appliances

Your appliances are like cars; skip maintenance and they’ll guzzle more juice than necessary. Regular check-ups ensure they run smoothly without hogging more current than they should.

Let’s say your fridge is working overtime because the coils are dirtier than a mud wrestler – that’s going to pump up your bill faster than an air pump inflates balloons. Keep those coils clean and watch your appliance sip electricity instead of chugging it.

Wrapping Up Troubleshooting

You’ve made it through the nitty-gritty of tackling those pesky electrical gremlins. From ensuring your junction boxes are safe as houses to getting to the bottom of why your bulbs are throwing in the towel too early, you’re now a troubleshooting champ. And let’s not forget about sorting out those flickering lights that seemed possessed or breathing life back into dead switches and wobbly outlets. Plus, with our savvy tips, you’ll be shaving dollars off your energy bill before you know it.

Now don’t just sit there like a bump on a log—put that newfound knowledge to work! If any of these fixes have left you scratching your head or if playing detective with your wiring isn’t quite your jam, call in a pro. Remember, good ol’ electricity is no joke; it demands respect and sometimes an expert hand. So give yourself a pat on the back for stepping up to the plate and remember: safety first, always.

Every year, countless homes are exposed to the silent threat of refrigerant gases leakage, with many unaware of the safety hazards until it’s too late, leading to exposure to harmful gases. Tackling this invisible menace requires early detection and a keen understanding of where these gas leaks typically originate, as well as the subtle signs that signal danger is afoot. Employing gas detectors is essential for identifying leakage and ensuring safety. From the gentle hiss of small leaks of refrigerant gases to an unexpected spike in your energy bill, these indicators are often mistaken for mundane household quirks rather than warnings of compromised indoor air quality due to harmful gases. Homeowners can reduce energy costs and ensure safety by using tools for early detection of refrigerant gases, taking swift action to protect their living spaces from the hazards posed by undetected gas leaks within their HVAC systems.

Dangers of Refrigerant and Natural Gas Leaks

Inhaling harmful gases can seriously impact health. Environmental and explosive risks also lurk with gas leaks.

Health Risks Abound

Breathing in refrigerant gas isn’t something to shrug off. These refrigerant gases, essential for refrigeration and cooling our spaces, pose cold safety hazards and are no friends to our bodies. Symptoms of exposure to refrigerant gases range from dizziness and headaches to more severe safety hazards like chemical burns or even frostbite if the gas makes direct contact with skin, whether from large leaks or small leaks. Long-term exposure? We’re talking about potential damage to vital organs.

Natural gas adds another layer of concern. While refrigerant gas is generally safe when contained, even small leaks can introduce carbon monoxide – a silent predator that’s colorless, odorless, and deadly. Detecting these refrigerant gas leaks often requires a black light to identify the otherwise invisible emissions. This sneaky villain, often undetected by small leaks, can cause flu-like symptoms impacting air quality at low levels but crank up the concentration, and it could lead to unconsciousness or worse. Utilizing tools like fluorescent dye can help identify these leaks.

The Ozone Takes a Hit

When refrigerants from an HVAC system escape into the wild blue yonder, they’re not just vanishing into thin air; small leaks can go undetected without proper gas leak detection systems, unnecessarily driving up energy costs. They’re actually teaming up with fluorescent dye and other chemicals high up in the atmosphere, chipping away at the ozone layer that shields us from harmful UV rays through processes not unlike infrared thermography, bubble testing, and ultrasound testing.

Think of refrigerant gases as double agents; they cool us down on earth but heat things up globally by contributing to climate change. Businesses are now turning to infrared thermography and bubble testing to detect leaks and reduce energy costs. Businesses are now turning to infrared thermography and bubble testing to detect leaks and reduce energy costs. Businesses are now turning to infrared thermography and bubble testing to detect leaks and reduce energy costs. And let’s not forget about energy costs skyrocketing for businesses because your system has to work overtime compensating for lost gases due to undetected refrigerant leaks, often found via infrared thermography or bubble testing.

Explosive Potential

Now onto natural gas – it’s great for heating homes and cooking meals for businesses until it decides to go boom, potentially spiking energy costs or indicating a refrigerant leak detectable by bubble testing! A small spark in a room filled with leaked natural gas, a common refrigerant, could turn into an action movie explosion scene real quick, dramatically escalating energy costs and necessitating immediate detection and bubble testing.

The danger zone is when a refrigerant leak allows enough gas to accumulate and mix with air at just the right ratio, making bubble testing a crucial leak detection method option. That’s when you get an explosive cocktail ready to ignite from even flipping on a light switch or starting an appliance, often signaling a refrigerant leak detected by gas leak detection systems, bubble testing, or infrared thermography.

Staying Safe

So how do we keep these invisible threats at bay with gas leak detection systems, infrared thermography, bubble testing, and dye? Regular maintenance checks, utilizing methods like infrared thermography and ultrasound testing, are key – think of them as your home’s health check-ups, ensuring gas leak detection systems remain effective. Technicians use fancy gear like electronic detectors, infrared thermography, or ultraviolet technology to spot those sneaky refrigerant leaks early on through detection and ultrasound testing.

It’s also smart to install gas leak detection systems, including carbon monoxide and refrigerant detectors, around your pad with infrared thermography and dye methods as a backup goalie against this silent threat. Plus, newer refrigeration systems come equipped with refrigerant sensors that alert you to potential gas leaks through infrared thermography and ultrasound testing when levels are getting sketchy.

Remember:

  • Headaches? Dizziness? Get fresh air ASAP.
  • Carbon monoxide alarms save lives.
  • Maintenance checks are non-negotiable.
  • Tech-savvy detectors identify problems pronto.

By staying vigilant about the detection and prevention of gas leaks in HVAC systems through methods such as ultrasound testing and dye, we safeguard our health, protect Mama Earth, and dodge potential disaster zones within our own four walls.

HVAC Leak Detection Methods Compared

Detecting and preventing gas leaks in HVAC systems is crucial for safety and efficiency, utilizing methods such as ultrasound detection and dye testing. Different methods offer varying levels of accuracy and practicality.

Soap Bubble Tests

Simple Yet Effective

The soap bubble test, often used in ultrasound and dye testing, remains a go-to for many gas leak detection systems. It’s straightforward:

  • Apply soapy water to suspected areas.
  • Watch for bubbles indicating a leak.

Pros and Cons

Pros:

  • Inexpensive
  • Easy to use
  • Immediate visual confirmation

Cons:

  • Not the most accurate method
  • Can miss small leaks
  • Time-consuming for large systems

Electronic Detectors

High-Tech Precision

Ultrasound detectors step up the game in HVAC leak detection, utilizing this non-invasive testing method without the need for dye. They sense refrigerants using advanced ultrasound testing sensors, pinpointing even tiny leaks that traditional soap bubbles and dye methods might miss.

Smaller Leaks Uncovered

These testing tools are great because they can find the sneaky, smaller leaks with their dye method. That’s something your eyes might not catch with a bubble test, unlike more advanced dye testing methods used in gas leak detection systems.

Pros:

  • Highly sensitive
  • Quick identification
  • Can detect multiple types of gases

Cons:

  • More expensive than soap bubbles
  • Require skilled operation
  • Regular calibration needed for accuracy

Professional Inspections

Expert Eyes on the Job

Regular professional inspections and testing of gas leak detection systems are like having a guardian angel for your HVAC system, ensuring safety through the method of dye application. Experts use different methods to ensure nothing slips by.

Early Detection Is Key

Catching leaks early through a testing method can save you a ton of trouble down the road. Pros in testing know exactly what signs to look for in gas leak detection, often employing the right method before any real damage is done.

Benefits include:

  • Expertise in various accurate method options.
  • Thorough checks beyond just leak detection.

Drawbacks might be:

  • Higher upfront costs compared to DIY methods.

Ultrasound and Infrared in Leak Detection

Detecting gas leaks in HVAC systems can be tricky, but modern testing technology gives us some slick tools and methods to sniff them out. Two of the coolest kids on the block in gas leak detection are ultrasound and infrared – they’re like superheroes for your HVAC system, utilizing advanced testing methods.

Ultrasound Technology

Ultrasound isn’t just for checking out babies before they’re born; it’s also a testing method whiz at catching sneaky leaks. Here’s how it works:

  • The tech employs a testing method that listens for high-frequency sound waves, which are indicative of a gas leak, that our ears can’t catch.
  • These testing waves get kicked up when gas shoots out of a leak detection method.

This testing method is super accurate because those frequency sound waves are like fingerprints—each one is unique to the type of leak it’s identifying during the testing process. So, if you’re employing an ultrasound detector for gas leak detection, you’re utilizing a top-notch method for testing.

Infrared Effectiveness

Now let’s talk about infrared cameras. These bad boys specialize in testing the environment and see the world differently than we do, particularly excelling in gas leak detection.

  • They spot temperature changes caused by escaping refrigerant.
  • This creates a visual map crucial for testing and pinpointing hot or cold spots during gas leak detection.

Infrared thermography is like having x-ray vision for heat patterns, crucial in gas leak detection and testing. Testing can pinpoint even tiny leaks by showing you a picture of where temperatures aren’t what they should be. Super cool, right?

Accuracy Showdown

So which is better? Well, both have their own superhero powers:

  • Ultrasound testing nails down exactly where that hissing noise, indicative of a gas leak detection issue, is coming from.
  • Infrared testing can show you a leak even if it’s silent as a ninja.

But here’s the thing—sometimes using testing and leak detection together is your best bet for identifying a gas leak. Like peanut butter and jelly in testing, they complement each other to give you an accurate leak detection process that’s hard to beat.

Complementary Methods

Sometimes though, these methods need backup:

  • Fluorescent dye testing lights up leaks under a black light.
  • The smell can also be a giveaway if sensors pick up odors we humans miss during gas leak testing.

Combining different testing methods ensures early detection of a gas leak and keeps your system running smooth as butter.

Real-Life Examples

Let me paint you a picture with some real-world stats on testing for a gas leak.

Imagine walking into a room with an HVAC system humming along quietly, unaware of a potential gas leak without proper testing. Now imagine there’s an undetected leak during testing, spewing refrigerant like nobody’s business—it could cost thousands in repairs and energy bills!

But then comes our heroes in testing for a gas leak: An ultrasound detector picks up high-pitched sounds of the elusive gas leak no one else hears, while an infrared camera shows us exactly where the trouble’s at without tearing down walls or guessing games. This dynamic duo just aced their testing and saved the day—and quite possibly loads of cash too from a potential gas leak!

Best Practices for Gas Leak Prevention

Keeping HVAC systems safe from gas leaks involves routine maintenance and high-quality installations, including thorough testing. Using top-notch fittings and components is also crucial for prevention, especially during testing for a gas leak.

Routine Maintenance Checks

Regular testing during check-ups is your first line of defense against gas leaks. They’re like a health check for your HVAC system. A technician will come in, conduct testing, poke around for a gas leak, and make sure everything’s tight and right. Consider it akin to an oil change for your heating or cooling system, but with the addition of gas leak testing.

  • Inspect pipes for signs of wear or damage.
  • Test system pressure to ensure it’s within safe limits.
  • Clean filters to prevent clogs and avoid a gas leak due to pressure build-up.

Installation Standards Matter

When you’re getting a new HVAC system, ensuring a leak-free install is key. It’s got to be done by the book, with no shortcuts or leaks taken. The pros know where each screw goes and why it matters. A shoddy job can leave you with a ticking time bomb instead of a comfy home.

  • Ensure proper sealing at all connection points.
  • Use state-of-the-art tools for accurate fitting installation.
  • Follow industry guidelines to reduce future leak risks.

Quality Fittings Only

Cheap parts might save some cash now but could cost you big later on. High-quality fittings are like good sneakers – they keep going while others give out. They resist rusting out or cracking under pressure, so you won’t have to sweat about leaks popping up unexpectedly.

  • Select materials proven to withstand corrosion.
  • Choose components designed for long-term durability.
  • Invest in parts from reputable manufacturers with solid track records.

Effective Response Strategies for Gas Leaks

Detecting a gas leak requires swift action and proper procedures. Safety is paramount, and coordination with professionals is essential.

Immediate Evacuation Steps

Smell something funky? It might be more than last night’s leftovers. A strong gas odor means “get out, fast!” Don’t flip switches or use anything electrical. Sparks could start a nasty surprise party no one wants to attend.

Once you’re clear of the house, call for help from a safe distance. No need to play hero; let the pros handle it.

Shutting Off Gas Safely

Think there’s a leak? Knowing how to shut off your main gas valve can be a game-changer. But only try this if you can do it safely:

  1. Locate the valve before there’s an issue.
  2. Use a wrench to turn it off—righty tighty does the trick.

Remember, if things feel dicey, just evacuate and wait for emergency services.

Professional Leak Assessment

Got suspicions of a leak? Time to ring up those emergency services:

  • They’ve got tools that go “beep” in all the right ways (gas detectors).
  • Pros will suss out even the sneakiest leaks.
  • They’ll fix things up faster than you can say “bubble testing.”

Trust them—they’ve got this down to an art.

Ensuring Safety and Compliance in HVAC Maintenance

Safety in HVAC maintenance hinges on strict adherence to local regulations and proper documentation. Certification of service technicians is crucial for handling refrigerants and ensuring system efficiency.

Local Regulations Adherence

HVAC systems are vital for both comfort and health. They control air quality and temperature. But they can be dangerous if not properly maintained. That’s why there are rules—lots of them. Each area has its own set of regulations that dictate how often your HVAC needs checking, who can fix it, and what procedures they must follow.

  • Annual inspections are often mandatory.
  • Specific guidelines exist for commercial vs. residential systems.

Technicians need to know these rules inside out. If they slip up, it’s not just a repair that’s botched—it could mean fines or worse, endangering lives.

Technician Certification Musts

Handling refrigerants isn’t child’s play—it requires skill and knowledge. The stuff that keeps your home cool can harm the environment if released carelessly into the air.

Service technicians undergo rigorous training to get certified:

  • They learn about different types of gases used in systems.
  • Training includes how to safely repair leaks without causing more damage.

This isn’t just good practice; it’s the law. Certified techs ensure your system runs efficiently, reducing energy consumption—and your bills!

Accountability Through Documentation

Imagine you’re a detective trying to solve a mystery about an HVAC breakdown or gas leak. How do you figure out what went wrong? You’d need clues, right? Well, documentation is like those clues for homeowners and insurance companies.

Every service visit gets logged:

  • What was done?
  • Who did it?
  • When was it completed?

This paper trail is gold if issues arise later on—or when claiming insurance coverage after an incident.

Documentation helps everyone stay on top of things:

  • Homeowners have accurate information about their equipment.
  • Service technicians can track the history of repairs.

It’s all about accountability—making sure everyone does their bit correctly.

Specialized Equipment Usage

Detecting gas leaks is like finding a needle in a haystack—you need the right tools. Service technicians come armed with specialized equipment designed specifically for testing HVAC systems:

  • Electronic detectors sniff out even tiny leaks.
  • Ultrasonic tools pick up sounds made by escaping gases.

These gadgets aren’t just fancy toys; they’re critical for early detection, preventing potential health hazards from poor air quality or fires due to gas buildups.

Energy Consumption Concerns

Let’s talk dollars and sense—energy dollars make sense! A well-maintained HVAC system is kinder to your wallet:

  • It uses less power when running smoothly.

But here’s the kicker: leaks in the system can lead to higher energy use because your equipment has to work harder than necessary. So detecting those sneaky leaks isn’t just good for safety; it’s smart economics too!

Remember this next time you hear your AC chugging along—it might be crying out for help (and costing you extra cash).

Key Takeaways in Leak Management

Detecting and preventing gas leaks in your HVAC system isn’t just a good practice—it’s a lifesaver. You’ve got the lowdown on the risks, the tech to spot trouble, and the savvy to stop leaks dead in their tracks. Remember, staying proactive with regular check-ups and embracing cutting-edge detection methods like ultrasound and infrared can mean the difference between a minor hiccup and a major headache. And let’s not forget about sticking to those best practices for leak prevention—your safety net against unexpected surprises.

Now it’s over to you! Don’t just sit on this goldmine of info; put it into action. Schedule that maintenance check, invest in reliable detection tools, or brush up on your emergency response plan. And if you’re feeling overwhelmed, reach out to an HVAC pro who can help keep your system tight as a drum. Your peace of mind (and wallet) will thank you for it.

“Energy and persistence conquer all things,” Benjamin Franklin wisely noted, and this rings true for the modern advancements in home appliances, such as electric tankless water heaters, which efficiently provide hot water without the need for a large tank, optimizing electricity usage and ensuring a consistent power supply. Tankless water heaters, with their condensing heating element, embody this spirit of innovation, merging energy savings through a compact design with the efficiency of an on-demand heating system—ideal for snug urban dwellings. Unlike their bulky hot water heaters with tanks, these sleek electric tankless water heaters and gas tankless water heater units offer consistent warmth without the wait or waste, including the high-efficiency condensing tankless water heaters. Electric or gas, condensing or non-condensing, tankless models with efficient pilot light systems are engineered for longevity and can lead to noticeably slimmer energy bills—a harmonious blend of performance and economy that’s reshaping how homeowners view domestic hot water systems and storage.

Tankless water heaters, a condensing marvel in the realm of homeowner utilities, stand out as a testament to technology’s role in elevating our daily lives. These units deliver many benefits through a simple yet profound promise: instant access to one of life’s essential comforts, eliminating the need for a pilot light and bulky storage tanks.

Energy Efficiency and Cost Savings

Tankless water heaters are a game-changer for homeowners, offering energy savings, cost efficiency, and condensing designs that optimize storage for customers. Heater manufacturers design condensing units with a storage tank to ensure customers don’t burn cash on heating water they won’t use.

No Wasted Energy

Imagine never paying to heat water in your storage tank that you won’t immediately use with a condensing heater our customers love. That’s the reality with tankless water heaters. Traditional heater tanks keep gallons of water hot 24/7, even when you’re not home, but a condensing unit could save energy. Check our advertisement to see how customers are benefiting. Tankless systems, in contrast to storage water heaters, heat up on demand, providing a different style water heater that bypasses the need for holding hot water like traditional hot water heaters, and can be more energy-efficient like condensing models.

  • No standby heat loss
  • Heat only what you need

Reduced Heat Loss

A big win for tankless units, often referred to as on-demand water heaters, is their style water heater design that says bye-bye to the traditional hot water heaters with storage tanks and embraces a condensing approach. This means less space for heat to escape in condensing tankless water heaters, a common issue with traditional hot water heaters, including the style water heater with larger tanks. It’s like wrapping your home in a cozy blanket — no warmth gets out, just like the efficient insulation of hot water heaters. Whether you prefer the sleek style water heater or opt for a gas tankless water heater, the comfort remains constant, akin to the reliability of storage tank water heaters.

  • Better insulation
  • Heat stays where it should

Tax Credits Galore

Uncle Sam sometimes throws you a financial bone for going green with hot water heaters, especially if you opt for a tankless water heater. With tankless hot water heaters often being ENERGY STAR® rated, you could snag some sweet tax credits or rebates.

  • Federal incentives
  • Boosts the affordability factor

Life Cycle Savings

The initial price tag of a tankless water heater might make your wallet wince, but think long-term benefits of hot water heaters! Over its lifetime, a tankless heater can save serious dough compared to old-school tanks.

  • More years of service
  • Less maintenance drama

Operational Cost Wins

Your monthly utility bills will do a happy dance with reduced energy costs from your tankless water heater system. We’re talking real money back in your pocket every single month with a tankless water heater.

  • Lower energy bills
  • Smarter power usage

In essence, these sleek machines pack an impressive punch. Let’s break down the deets:

Energy Star Excellence

Tankless heaters often come with that coveted ENERGY STAR label. This means tankless water heaters meet strict guidelines set by the U.S Environmental Protection Agency (EPA).

Safety First

The absence of bulky heater storage means a lower risk of leaks or water damage. Plus, precise temperature control reduces scalding hazards.

Homeowner Happiness

People love more space and less noise — two perks of going tankless with a water heater. It’s all about comfort without compromising on performance or safety with a tankless water heater.

To sum it up:

  • Tank-free = stress-free.
  • The government might help pay for your eco-friendly upgrade to a tankless water heater.
  • Your bank account will thank you over time with fewer repair calls and longevity wins when you invest in a tankless water heater.
  • Every month is a little cheaper thanks to your tankless water heater’s efficient operation that keeps coins in your pocket instead of flying out the chimney.

So there you have it: Investing in a tankless water heater can mean major advantages for both energy efficiency and cost savings — benefits that’ll keep giving back year after year.

Design Advantages: Space-Saving Features

Tankless water heaters are a game-changer, especially. Tankless water heaters offer a sleek design and flexibility in installation that traditional tanks can’t match.

Wall-Mounted Saves Space

Imagine reclaiming the area where your bulky hot water tank heater used to be. That’s what happens with tankless models. These tankless water heater units get mounted on the wall, up and out of the way.

  • Frees up floor space for storage or other uses.
  • Ideal for smaller homes and apartments where every inch counts, a tankless water heater is an excellent choice.

Closer Installation, Faster Heat

Positioning matters with water heaters. With tankless water heater systems, you’re not tied down to one spot. Heaters can be installed much closer to where you actually use hot water.

  • A shorter distance for hot water to travel from the heater means quicker access.
  • Reduced wait time translates into less wasted water.

Outdoor Models Expand Options

Not all homes have space indoors for a water heater. That’s where outdoor tankless models shine. Tankless water heaters sit outside, so they don’t take up any room in your home.

  • Perfect solution for homes lacking indoor utility space.
  • Avoids crowding basements or closets often used for storage.

Minimalist Look Fits In

Modern design embraces clean lines and uncluttered spaces, often incorporating a tankless water heater for its sleek profile. Tankless heaters fit this vibe perfectly. Their compact size and minimalist look make tankless water heaters blend seamlessly with contemporary interiors.

  • No unsightly large tank disrupting your home’s aesthetic.
  • The small size of a tankless water heater makes them barely noticeable in any room setting.

In terms of placement flexibility, these water heater systems score top rankings compared to their bulky predecessors. It’s not just about the physical dimensions of a water heater either; it’s also how these units can integrate into your living space without causing disruption or requiring major renovations just to accommodate them.

Consider this: A traditional 50-gallon water heater tank might take up nine square feet of floor space standing over five feet tall—space that could otherwise serve as an extra closet or even a small office nook! On the other hand, many wall-mounted tankless water heater models measure only about the size of a carry-on suitcase—and they hang on the wall!

Here are some real-world advantages:

  • You could install a water heater in a closet or even under stairs – places previously unthinkable for traditional tanks.
  • For outdoor enthusiasts who like tidy garages, an outdoor model means more room for bikes and tools instead of sacrificing area to store hot water.

And let’s not forget aesthetics—an important element when you consider how appliances like your water heater contribute to your home’s overall feel. A clunky old-school heater can stick out like a sore thumb while its modern counterpart can go almost unnoticed or even add a touch of tech-savvy flair to your decor.

To sum it up, going tankless isn’t just about saving energy—it’s also about reclaiming space and adding convenience without compromising style. When upgrading from an old system, note how much more efficient your living area becomes after making the switch—proof that sometimes, good things come in smaller packages!

Uninterrupted Hot Water Supply

Instantaneous Heating Perks

Tankless water heaters are like magic for your home’s hot water supply. They zap cold water into cozy warmth the second you need it. No more drumming fingers on the counter, waiting for a shower to heat up.

  • Tankless systems heat water on demand.
  • Say goodbye to running out mid-shower.

Zero Wait Time

Imagine this: You’re late and need a quick hot shower, but someone just finished theirs. With a traditional hot water heater, you’d be out of luck. But tankless? It’s ready to go!

  • Traditional tanks need recovery time.
  • Tankless offers continuous heating.

High Demand, No Problem

Got a big family or live in a house where everyone seems to need hot water at once? A tankless system is your new best friend. It keeps up with the hustle without breaking a sweat.

  • Supports numerous showers and faucets.
  • Handles high usage without hiccups.

Simultaneous Fixture Use

Think about those mornings when bathrooms are buzzing, dishwashers are running, and laundry is going. Tankless systems ensure no one gets an icy surprise halfway through their routine.

  • Multiple appliances can run together.
  • Consistent temperature across all fixtures.

In homes that buzz with activity, having enough hot water is crucial. The advantages of tankless water heaters shine brightest when there’s never a drop in temperature even when the dishwasher, washing machine, and every shower in the house are all in use at once. This isn’t just convenient; it’s life-changing for busy households.

Professional plumbers often tout these systems as game-changers for both comfort and efficiency. And they’re not wrong! Imagine stepping into what you expect to be a steamy shower only to be greeted by an arctic blast because someone else used up all the warm vibes—tankless systems make that nightmare history.

The beauty of these modern marvels lies in their ability to heat water instantaneously—there’s no bulky tank sitting around hoarding hot water until it decides to grace your faucet or showerhead with its presence. Instead, as soon as you turn on that tap or step into the shower, cold water travels through pipes and gets heated by powerful elements within seconds—meaning much less wasted time (and less shivering).

Here’s how this translates into real-life benefits:

  • Endless back-to-back showers? Check.
  • Laundry day while dishes pile up? Not an issue.
  • Filling up that oversized tub for some me-time? Absolutely possible.

And let’s not forget how this ties back into saving space from our previous chat about design advantages—without needing room for a big ol’ tank, these sleek units fit snugly against walls or tucked away in closets. More room for activities!

In essence:

  • Tankless heaters provide non-stop hot supply.
  • They’re perfect partners for heavy-duty days.
  • Your lifestyle doesn’t have to bend around your heater’s schedule anymore—it bends around yours!

So next time you’re standing there with shampoo in your hair and suddenly feeling like you’ve been transported to Antarctica because someone flushed the toilet—remember there’s an alternative that ensures your comfort remains uninterrupted: The mighty tankless water heater!

Electric vs. Gas: Energy Source Considerations

Choosing between electric and gas tankless water heaters depends on installation ease, efficiency needs, and energy availability. While electric models simplify setup, gas units cater to high-demand homes with better flow rates.

Simpler Installation

Electric tankless water heaters win hands down. They’re like plug-and-play devices for your home’s hot water needs. No fancy venting systems or gas lines needed here – just a proper electrical outlet and you’re golden.

Maintenance? It’s a breeze with electric models. You won’t be wrestling with complex parts or fearing gas leaks. And since they’re so straightforward, you’ll save some cash on service calls too.

Higher Flow Rates

Now let’s talk about the big guns: gas models. These bad boys are built for action, ready to handle the demands of a full house without breaking a sweat. Think multiple showers running alongside that dishwasher without any cold surprises.

Gas units boast higher flow rates compared to their electric cousins. This means more hot water flowing through your pipes faster – perfect for large families where hot water is always in demand.

Efficiency Matters

Efficiency is key, and electric heaters have it in spades at the point of use – we’re talking 100% energy efficiency! Every ounce of electricity goes straight into heating your water; nothing wasted.

Gas models are still efficient but lose some points due to venting losses. They need to exhale somewhere, right? But even then, they’re pretty good at keeping most of that heat for your shower instead of the great outdoors.

Energy Source Availability

The energy source available in your area might make this decision for you. It’s like choosing between chocolate and vanilla when there’s only one flavor in stock.

  • Got electricity? Then an electric heater is up for grabs.
  • Natural gas lines running by your home? A gas model could be yours.
  • Propane more your style? There are tankless heaters that run on that too!

It all boils down to what’s on tap in your neck of the woods.

Installation Insights for Tankless Heaters

Professional installation and proper sizing of tankless water heaters are non-negotiable. They ensure safety and meet the hot water demands of your household.

Professional Installation

Tankless heaters aren’t a DIY affair. You’ll need a pro to hook it up right. They know the ins and outs, making sure everything’s up to code. Safety’s key here, folks. We’re talking about dealing with gas lines or high-powered electric units – no place for guesswork.

Size Matters

Ever been last in line for a shower only to get hit with cold water? Not fun. That’s why size is big-time important for tankless heaters. It’s all about how much hot water you need at once. Get it wrong, and you’ll be shivering or boiling over.

Professionals use fancy calculations to figure out the right size for your pad:

  • Number of bathrooms
  • Dishwashers, washing machines, you name it
  • Peak hour demand – like when everyone’s getting ready in the morning

System Upgrades

Sometimes your home isn’t ready straight out of the box for a tankless heater. Older places might need an upgrade:

  • Electric models can be power-hungry beasts needing more juice.
  • Gas units might require bigger pipes or new venting setups.

You don’t want to skimp on this part. It could mean the difference between smooth running and a total flop.

Ventilation Is Key

Electric or gas, they both gotta breathe but in different ways:

Electric Ease

No fumes means no vents needed. Electric models are chill like that.

Gas Needs Space

Gas burners produce exhaust that needs venting out safely:

  • Proper ducting is crucial.
  • Carbon monoxide ain’t something to mess with.

Make sure there’s enough room where you plan to install it.

In wrapping up, whether you’re ditching that old storage tank or upgrading from another traditional tank system, remember these points:

  1. Call in the pros.
  2. Size it right.
  3. Check if your house needs an upgrade.
  4. Ventilate properly based on your model choice.

Do it right, and those showers will never go cold on you again!

Addressing Flow Limits in Simultaneous Usage

Managing flow rates efficiently is crucial during peak times. Smart tech and strategic planning can help mitigate the impact of flow rate limitations.

Prioritize Appliance Use

Peak hours at home mean everyone’s using water – showers, dishwashers, laundry machines – you name it. But here’s a pro tip to keep things running smoothly: prioritize your appliance use. It’s like deciding who gets to charge their phone first when there’s only one outlet left at the airport.

  • Shower before breakfast or after dinner.
  • Run the dishwasher overnight or during work hours.

Smart Tech Staggering

Ever heard of smart homes? Well, they’re not just about talking fridges. Smart technology can be a game changer for your water heater too.

  • Program your appliances to turn on at different times.
  • Maintain consistent hot water without overloading the system.

Imagine never having to choose between a hot shower and clean dishes again!

Install Multiple Units

Got a big family? More people means more demand for hot water. Instead of fighting over who showered longest, consider getting multiple tankless heaters installed around your house.

  • One for each bathroom ensures no cold surprises mid-shower.
  • A dedicated unit for the kitchen keeps those pots and pans sparkling.

It’s like having a personal butler for every room, but just for hot water!

Upfront Planning Patterns

A little bit of planning goes a long way with tankless heaters. Don’t wait until you’re shivering in a cold shower to think about usage patterns.

  • Schedule bath times if necessary.
  • Spread out laundry days throughout the week instead of doing it all on Saturday night.

It’s all about playing it smart and keeping that warm water flowing when you need it most.

Summarizing Tankless Heater Upsides

Let’s cut to the chase—going tankless is like giving your home a hot water makeover. You’re not just saving closet space; you’re snagging a never-ending stream of hot showers while keeping your bills in check. Imagine kicking back, knowing that your sleek, energy-efficient gadget is ticking away quietly, supplying cozy warmth without the bulk and fuss of old-school tanks.

Ready to take the plunge? Think about how sweet it’ll be to reclaim that utility closet or how your wallet will thank you when those energy bills drop. If you’ve got questions or need a hand picking out the perfect model, give us a shout. We’re here to help you make a splash with the right tankless water heater for your pad!

When power outages strike without warning, the value of having a Generac standby generator or one of the best electric generators, like portable generators, becomes crystal clear. These robust systems keep homes humming by activating automatically during disruptions, ensuring that daily life proceeds safely and without interruption.

The choice of whole house generator fuel is pivotal, influencing not only the generator’s performance but also its longevity, efficiency, and the ongoing costs associated with keeping your sanctuary powered in times of need, much like the maintenance considerations for a furnace.

Selecting a whole house generator is about balancing needs and resources; size it to your home’s demands while considering how different fuels—from natural gas to diesel—impact everything from output to maintenance. With the right fuel powering your portable or standby Generac generator, you secure peace of mind knowing that your household stands resilient against any electricity uncertainty.

Types of Fuels Used in Whole-House Generators

Whole-house generators offer diverse fuel options. Each type has unique benefits and considerations.

Natural Gas Generators

Natural gas is a common choice for home generators. It’s connected through utility lines directly to homes.

Natural Gas Generator

Advantages of Natural Gas

  • Directly piped from municipal supplies.

  • Produces fewer pollutants than oil-based fuels.

Considerations for Natural Gas

  • Installation requires certified professionals.

  • Vulnerable to disruptions during natural disasters.

Propane Generators

Propane offers high energy and storage longevity. It’s less reliant on continuous supply infrastructure.

Benefits of Propane

  • Dense energy content ensures longer run times.

  • Stable shelf life with proper tank maintenance.

Storage and Safety

  • Outdoor storage is mandatory for safety.

  • Inspections prevent leaks and ensure operation integrity.

Diesel Generators

Diesel excels in efficiency, especially under strain. It’s reliable over extended periods, making it ideal for emergencies.

The generator is usually placed outside the house.

Why Diesel?

  • Handles sustained loads with ease.

  • Fuel economy surpasses gasoline alternatives.

Maintenance and Efficiency

  • Regular upkeep prevents operational issues.

  • Performs best when running at full capacity.

Gasoline Generators

Gasoline is the most accessible generator fuel. Service stations provide easy refueling opportunities nationwide.

Accessibility of Gasoline

  • Available ubiquitously across regions.

  • Refueling mimics everyday vehicle practices.

Pros and Cons

Pros:

  • Quick start-up facilitates immediate use.

Cons:

  • Highly combustible nature demands caution.

Dual-Fuel Generators

Dual-fuel units adapt to varied fuel availabilities. They balance cost-effectiveness with practicality during shortages or price hikes.

Flexibility of Choice

Multiple fuels cater to user preferences. Users can switch based on current fuel prices or availability.

How They Work

Toggle between fuels like gasoline and propane effortlessly. These generators adapt seamlessly to market conditions or personal needs.

Comparing Fuel Types for Whole-House Generators

Choosing the right fuel for a whole-house generator involves considering availability, cost, and environmental impact. Storage requirements and power needs also play crucial roles in the selection process.

Availability and Accessibility

Fuels vary by region. Some areas have abundant natural gas, while others rely on propane or diesel. Infrastructure influences continuous supply, with local market prices impacting cost-effectiveness.

Cost-Effectiveness

Operating costs differ among fuel types. Efficiency ratings determine fuel consumption. Initial setup expenses are integral to overall affordability.

Emissions Impact

Carbon dioxide and nitrogen oxides emissions vary by fuel. Regulations may restrict certain fuels based on emissions standards. Renewable biofuels present environmentally friendlier options.

Shelf Life Storage

Propane boasts an indefinite shelf life when stored correctly. Diesel degrades over time without stabilizers. Gasoline demands regular rotation due to freshness concerns.

2 technicians revising an open generator

Power Needs Evaluation

Total wattage required by home systems must be calculated. Peak demand considerations influence generator size choice, avoiding unnecessary expense from overestimation.

Geographic Climate Factors

Cold climates necessitate specific generator features for optimal performance; coastal areas require corrosion-resistant materials; altitude can impair engine efficiency.

Local Infrastructure Reliability

The reliability of a community’s natural gas or electrical grid is significant, especially in rural versus urban settings where access to pipeline-supplied natural gas varies greatly.

Safety Compliance

Adhering to building codes and fire safety standards is mandatory for installation safety. Proper ventilation is essential to prevent carbon monoxide issues.

Ventilation Space Needs

Generators require space for safe operation and servicing along with adequate airflow for cooling purposes—placement factors in noise levels relative to living spaces.

Delivery Considerations

Onsite delivery feasibility depends on location specifics—bulk purchasing might offer savings; establishing supplier relationships ensures consistent supply continuity.

Permitting Requirements

Understanding zoning laws affecting property use is critical—certified electricians ensure installations meet local codes; non-compliance risks fines and legal complications.

Home System Integration

Compatibility with existing electrical and HVAC systems is necessary—smart generators should integrate smoothly without disrupting standard operations.

Maintenance Schedules

Regular maintenance like oil changes extends generator lifespan—inspections prevent corrosion while clean air intake systems maintain performance efficiency.

Wear and Tear Effects

Different fuels affect engine wear rates—quality lubricants minimize damage while routine checks detect early wear signs, potentially averting extensive repairs later on.

Long-Term Operational Costs

Lifetime costs include replacement parts and labor—energy-efficient models might incur higher upfront costs but save money long-term through reduced operational expenses.

Pros Cons Assessment

Balancing reliability against environmental concerns is key—as well as weighing immediate costs against long-term savings while prioritizing personal convenience versus accessibility considerations.

Consulting an Expert

Professionals tailor solutions to individual circumstances—they evaluate site conditions, recommending suitable sizes while ensuring industry best practice compliance through safety checks, embodying the champion services offered today.

Determining the Right Fuel Type for Your Home

Choosing the right fuel for a whole house generator involves understanding power needs and considering geographic, climate, and local infrastructure factors. Safety regulations and compliance are also crucial in this decision-making process.

Evaluating Power Needs

Identify your home’s energy requirements. This is essential to selecting a generator with the appropriate capacity. Examine your electricity bills or consult an electrician to determine peak usage. Consider which appliances are vital during an outage. These typically include refrigerators, heating systems, and medical equipment.

Geographic and Climate Considerations

Your location matters when choosing fuel types. In colder regions, propane might be a reliable choice for heating due to its lower freezing point compared to diesel. Conversely, natural gas could be more accessible in urban areas. Assess seasonal weather patterns too; areas prone to hurricanes may experience disrupted fuel supply chains.

Nice Installation of a Power Backup Generator

Fuel Availability and Local Infrastructure

Investigate local fuel accessibility before deciding on a portable or standby generator type, such as Generac, to ensure a reliable power source. Natural gas lines directly connected to homes offer convenience but aren’t available everywhere. Propane can be stored onsite but requires space for tanks. Diesel generators need regular refueling, posing challenges if suppliers are distant.

Safety and Regulatory Compliance

Safety is paramount when installing a whole house generator. Adhere strictly to Ogden, Utah local codes regarding fuel storage and generator placement for both portable generators and standby generators, ensuring reliable power and compliance with navigation (nav) regulations. Regulations often dictate minimum distances from buildings or property lines for certain fuels due to their flammability risks.

Installation Considerations for Different Fuel Types

Choosing the right fuel type for a whole house generator involves multiple factors. Space, delivery, legal compliance, and system integration are critical to consider.

Space and Ventilation

Whole house generators need proper space. This ensures safety and efficiency. Gasoline units often require less room than diesel counterparts. However, they need significant ventilation due to fumes. Natural gas models may fit in smaller areas but still demand airflow to prevent hazards.

Large generators can be bulky. They might take up more outdoor space. Always check local zoning laws before installation to ensure you have enough room.

Fuel Delivery and Storage

Fuel availability is essential for generator operation. Propane and diesel require on-site storage tanks. These tanks must be filled regularly by a professional service to ensure champion services today.

Natural gas connects directly to the home’s supply line; no storage is needed here. But during outages, if the natural gas supply is compromised, it could affect your generator’s functionality.

Propane offers longer shelf life compared to gasoline or diesel. It’s a good choice if you expect infrequent use with long periods of standby time.

Permitting and Code Compliance

Legal requirements vary by location. Some places demand specific permits for generator installation. Others enforce strict building codes related to fuel types used in residential areas.

Ensure you’re aware of these regulations before choosing your fuel source:

  • Check with local authorities about necessary permits.

  • Understand code restrictions around fuel storage.

  • Ensure that your installation contractor is familiar with these regulations too.

Failing to comply can lead to fines or removal orders.

Integration with Existing Home Systems

Your home’s current systems impact generator integration:

  • Electrical wiring must support the added load of a whole house generator.

  • For natural gas generators, existing gas lines should accommodate increased flow.

  • Smart home systems might require additional configuration for seamless operation during power outages.

Consider hiring professionals who specialize in integrating generators into homes like yours:

  • They can assess compatibility with your electrical panel and other systems.

  • Expertise ensures safe connection without risking damage or inefficiency.

Fuel Type Impact on Generator Maintenance and Longevity

The fuel type you choose for your whole-house generator significantly affects maintenance routines, the longevity of the unit, and the overall cost of operation. Adequate and timely maintenance ensures that your generator remains reliable when you need it most and extends its service life.

Routine Maintenance for Different Fuel Types

Natural Gas Generators require less maintenance than those that use liquid fuels. These units typically demand regular checks of the spark plugs, air filters, and oil changes. However, it’s essential to ensure that the gas lines are in impeccable condition to prevent leaks.

Propane Generators also have a relatively low maintenance requirement, similar to natural gas units. Inspections of the fuel lines and tanks for leaks and corrosion are critical. Propane, like natural gas, burns cleanly, which helps in reducing engine deposits and prolonging engine life.

Diesel Generators are built for endurance but require vigilant maintenance. Fuel filters and water separators must be checked and replaced regularly to prevent blockages and corrosion. Diesel fuel can also gel in cold temperatures, impacting the heating efficiency, which means additives may be necessary for colder climates to maintain proper heating performance.

Gasoline Generators frequently require carburetor cleaning and spark plug changes due to the characteristics of gasoline fuel. Standby generators, especially portable models for commercial use, often require stabilizers if the power unit is not run regularly, as gasoline can degrade and cause starting issues over time.

The Impact of Fuel Choice on Wear and Tear

Different fuels burn at different rates and conditions, influencing the wear and tear of generator components. Natural gas and propane burn cleaner and cooler, usually resulting in less stress on engine parts, whereas diesel and gasoline can run hotter and may lead to more frequent repairs and part replacements over time.

Operation Cost Over Time

The long-term costs of running a whole house generator vary by fuel type:

  • Gasoline: Often less expensive initially but can become costly due to frequent maintenance.

  • Diesel: Higher upfront cost; however, it offers better efficiency in large-scale applications.

  • Propane/Natural Gas: Lower maintenance costs but may have higher installation expenses due to required gas lines.

The efficiency of each fuel type also plays into overall cost-effectiveness:

  • Gasoline Generators typically have lower efficiency compared to others.

  • Diesel Units are more efficient under heavy loads.

  • Propane/Natural Gas Generators maintain consistent efficiency levels with cleaner burning properties.

Making an Informed Decision on Fuel Types

When choosing a whole-house generator, selecting the right fuel type is pivotal, especially if it needs to integrate seamlessly with your home’s furnace. It will influence not only the initial setup but also the long-term operation and maintenance of your system. Decisions regarding fuel types should be made with consideration of your specific needs, location, and budget.

home owner moving his portable generator

Assessing Pros and Cons

Natural gas, propane, diesel, and gasoline are common fuels for whole house generators. Each has unique advantages and limitations.

Natural Gas:
Provided through pipelines, this fuel option is convenient if your home is already connected to a municipal gas line. It’s one of the cleanest burning fossil fuels and provides an uninterrupted supply. However, its availability depends on the local infrastructure, and it may be unusable during some natural disasters that disrupt gas lines.

  • Pros: Widely available, continuous supply line, low emissions.

  • Cons: Less energy-dense than other fuels, requires gas lines installation.

Propane:
Like natural gas, propane burns cleanly but requires on-site storage tanks, which can be refilled by local suppliers. This fuel has a long shelf life, making it suitable for areas with less frequent power outages. Tanks have specific placement regulations and represent an additional cost for installation and maintenance.

  • Pros: Long shelf-life, more energy per gallon than natural gas.

  • Cons: Requires storage tank, potential for leaks.

Diesel:
Known for reliability and efficiency, diesel generators are great for emergency power. Diesel fuel has a great shelf life and is easier to store than gasoline, but it can be more expensive and its engines often run louder. Plus, diesel engines may require rigorous maintenance routines.

  • Pros: High energy density, reliable in cold weather.

  • Cons: Periodic maintenance needed, higher emissions than gas or propane.

Gasoline:
Although commonly available, gasoline’s high volatility and shorter shelf life make it a less practical choice for standby generators. Gasoline units require frequent refueling, especially during prolonged outages, and price fluctuations are, at times, quite significant.

  • Pros: Easily accessible at service stations.

  • Cons: Short shelf-life, highly flammable.

The Role of Professional Consultation

Navigating the complex landscape of fuel types, power requirements, and generator models can be daunting. That’s why a consultation with a generator professional is invaluable, whether you’re considering standby generators, portable units, or power solutions for your RV. They will assess your power demands, local fuel availability, safety codes, and environmental considerations to recommend an optimal solution. A professional can also advise on generator placement, permits needed, and provide an installation plan tailored to your property.

Experts provide:

  1. Customized recommendations

  2. Installation guidance

  3. Safety protocols

  4. Maintenance tips

A certified technician ensures the chosen fuel matches with generator specifications and local regulations.

The future of backup power is steering towards more sustainable options. Innovations like generators that can integrate with solar systems or those designed to be compatible with renewable natural gas (RNG) are on the rise. It is also becoming more common to see generators with smart features for monitoring fuel consumption and efficiency. Keep these innovations in mind as they can future-proof your investment and may offer a greener footprint and potential cost savings down the line.

Current trends show:

  • Increasing interest in eco-friendly options

  • Research into longer-lasting fuel cells

  • Development of more efficient generators

Adapting to these changes can lead to cost savings and environmental benefits over time.

FAQ Section

What fuel options are available for whole-house generators?

Whole-house generators typically run on a variety of fuels such as natural gas, propane, diesel, and less commonly, gasoline. There are also models that can operate on more than one type of fuel, known as dual-fuel or bi-fuel generators.

How do I determine which fuel type is best for my whole-house generator?

The best fuel type for your whole-house generator depends on factors such as the availability of the fuel in your area, storage possibilities, cost, and the specific needs of your home. Natural gas is a good choice if you have a reliable supply line, while propane is ideal for areas where natural gas is not available. Diesel is known for its efficiency and long shelf life, making it suitable for infrequent but critical use.

Are there any environmental considerations when choosing a fuel type for my generator?

Yes, fuel types differ in their environmental impact. Natural gas burns cleaner than diesel or gasoline, producing fewer emissions. Propane also has a relatively low environmental impact. However, renewable energy advancements are influencing generator technology, and future options may offer even greener alternatives.

Is it possible to switch fuel types after installing a whole-house generator?

Typically, generators are designed to operate on a specific fuel type, so switching fuels is not common. However, some dual-fuel generators allow switching between natural gas and propane. Converting a generator to a different fuel type should only be done by professionals and may not be supported or safe for all models.

What are the advantages and disadvantages of using propane for my whole-house generator?

Propane has the advantage of a long shelf life without degradation and is available in areas without natural gas lines. It’s also cleaner-burning than gasoline or diesel. However, propane requires a storage tank, and its cost can fluctuate more than natural gas.

How do the maintenance requirements differ among fuel types for whole-house generators?

Maintenance varies by fuel type. Diesel engines may require more frequent oil and filter changes due to their design, while natural gas and propane generators typically have less intensive maintenance schedules. Gasoline generators may require more frequent maintenance due to the volatility of the fuel.

Does the fuel type affect the noise level of the generator?

The noise level of a generator is more closely related to the generator’s design and insulation than the fuel type. However, diesel engines may run louder than natural gas or propane engines. It’s important to consider the generator’s specifications for noise level rather than the fuel type alone.

Can I have a backup fuel option in case my primary fuel source is unavailable?

Yes, if you anticipate potential interruptions in your primary fuel supply, you can choose a dual-fuel generator that allows you to switch between two types of fuel, such as natural gas and propane.

How does fuel storage safety differ among fuel types for generators?

Each fuel type has specific storage safety requirements. Natural gas is supplied via pipelines and does not require on-site storage. Propane is stored in tanks that have strict placement and maintenance regulations. Diesel and gasoline require proper containers and well-ventilated, cool, and dry storage areas away from living spaces due to their flammability and potential for degradation.

How will the choice of fuel type for my whole-house generator impact installation costs?

Installation costs can vary significantly depending on the fuel type. Natural gas generators may require less expensive installation if you already have a gas line in your home. Propane and diesel generators may require additional costs for storage tanks and their installation. Always consult with a professional to get an accurate estimate for your specific situation.

©2024 Champion Services All Rights Reserved